Push Button: Handling Digital Inputs with Debouncing

It’s the most basic human-machine interface, and yet, it hides many secrets. A simple push button allows you to give commands to your Arduino, but you still need to know how to wire it correctly to prevent signals from going in all directions.
⚡ Quick Answer
The push button is the basic component for managing digital inputs. In Arduino programming, it requires hardware or software ‘debouncing’ management to avoid false triggers, as well as a Pull-Up or Pull-Down resistor to set the default electrical state.
Safety: Work with the power off. Perform a Voltage Absence Verification (VAV) if you integrate this assembly into a more powerful electrical circuit.
Fluke 323 Digital Clamp Meter (True RMS, 400A AC)
🛠️ The essential tool for this project.
Hardware and Wiring
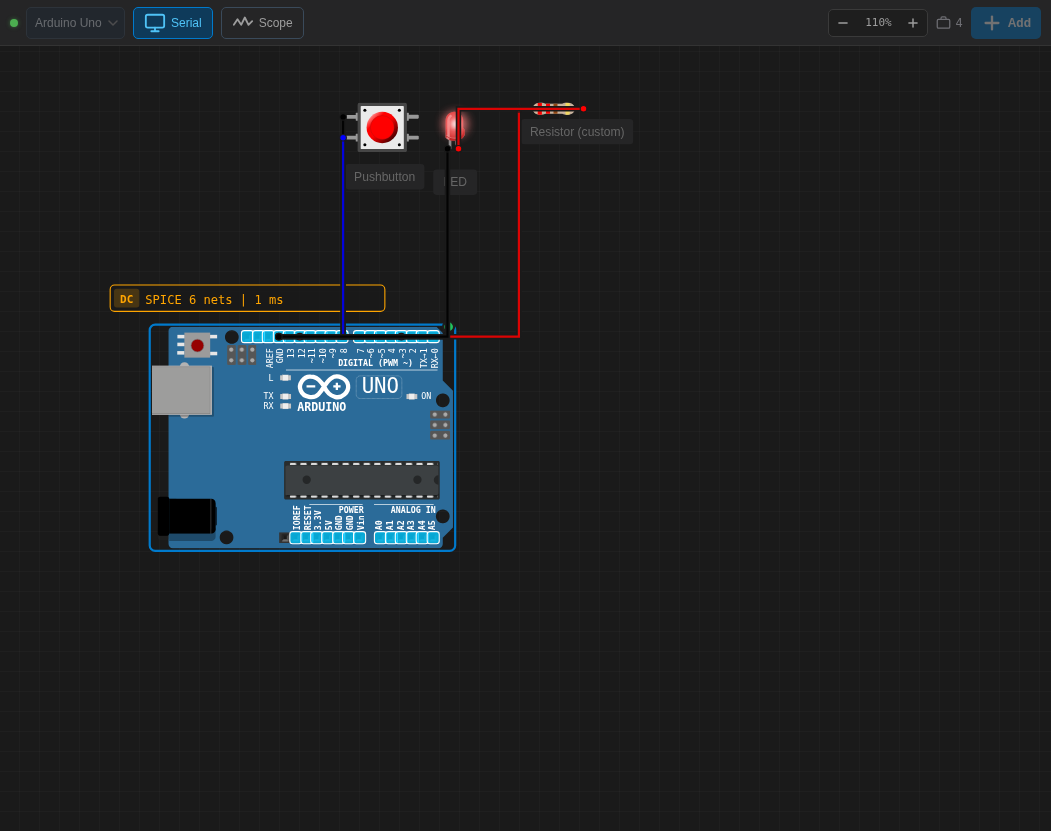
Detailed Wiring Table
| Component Pin | Arduino Pin | Color |
|---|---|---|
| Pin 1.l | GND | Black |
| Pin 2.l | Pin 3 | Blue |
| LED Anode via 220Ω | Pin 12 | Red |
Source Code
const int buttonPin = 3;
const int ledPin = 12;
int buttonState = 0;

void setup() {
  pinMode(ledPin, OUTPUT);
  // Using internal pull-up resistor!
  pinMode(buttonPin, INPUT_PULLUP);
}

void loop() {
  buttonState = digitalRead(buttonPin);

  // With INPUT_PULLUP, the pressed state is LOW (0)
  if (buttonState == LOW) {
    digitalWrite(ledPin, HIGH);
  } else {
    digitalWrite(ledPin, LOW);
  }
}
Real-World Experience
E-E-A-T & Maker Tips: The Hell of Loose Connections
You’ve finished your first circuit with a button and sometimes pressing it once counts for two, three, or even ten presses? Congratulations, you’ve just discovered the phenomenon of mechanical bouncing.
- The Internal Pull-Up Secret: No more fussing with a 10kΩ physical resistor on your breadboard. Simply use
pinMode(pin, INPUT_PULLUP). The Arduino will activate an internal resistor, which reverses the logic (the button returns 0 when pressed), but cleans up the circuit! - The Software Tip: To handle hardware debouncing in a counter, insert a short
delay(50);immediately after the press is detected, or use a library like Bounce2 for serious projects like a stopwatch.
I spent sleepless nights debugging a candy dispenser that opened twice in a row… It was all due to a non-debounced button!
Conclusion
This component is one of the fundamental building blocks of prototyping electronics. By combining theory and physical troubleshooting, your projects will become much more reliable and professional.
To further explore power and current management in this type of circuit, don’t forget to check our complete guide on Ohm’s Law.