
Oxidized: Installation and Configuration for Network Backups (2026 Guide)
🚀 Quick Summary (30s)
- ✅ Role: Automation of network configuration backups (Cisco, Juniper, HP).
- ✅ Benefit: Open source, lightweight, supports hundreds of models.
- ✅ Output: Backs up to flat files or a Git repository for versioning.
Ideal for replacing Rancid and modernizing your NCM management.



Table of Contents
OXIDIZED – Installation and Configuration
Oxidized is an open-source tool designed for network administrators and engineers. It is primarily used to automate configuration backups for network equipment, such as routers and switches, via SSH or Telnet. Here is a general summary of Oxidized’s features and usage:
Oxidized simplifies automated network configuration backups, offering a versatile solution for various devices. It stores these configurations, enabling efficient tracking and management. Additionally, it integrates with other tools to automate network management. Security is also a priority, protecting sensitive data. In short, Oxidized makes network management smooth and secure.
Install Oxidized
Here is an example using an Ubuntu distribution:
apt update && apt ugprade && apt -y install ruby ruby-dev libsqlite3-dev libssl-dev pkg-config cmake libssh2-1-dev libicu-dev zlib1g-dev g++
gem install oxidized -v 0.28.0 && gem install oxidized-script oxidized-web
Configure Oxidized
Oxidized configuration is in YAML format and can be loaded from two locations: /etc/oxidized/config (system configuration) and ~/.config/oxidized/config (user configuration). These files are merged for flexibility, for example, to store global system information and specific user details.
It is recommended to run Oxidized under its own username for best practices. This can be done using standard command-line tools for efficient management.
useradd -s /bin/bash -m oxidized
It is recommended not to run Oxidized as a superuser (root).
switch to oxidized: su oxidized && cd
run the command: oxidized
this will create the file: ~/.config/oxidized/config
| username: admin password: strongpasspass model: ios resolve_dns: true interval: 3600 use_syslog: false debug: false threads: 30 timeout: 20 retries: 3 prompt: !ruby/regexp /^([\w. @scripts/electrotuto-speed-booster-v3.php]+[#>]\s?)$/ rest: 127.0.0.1:8888 next_adds_job: false groups: {} models: {} pid: “/home/oxidized/.config/oxidized/pid” stats: history_size: 10 input: default: ssh, telnet debug: false ssh: secure: false ftp: passive: true utf8_encoded: true output: default: file file: directory: “/home/oxidized/.config/oxidized/configs” source: default: csv csv: file: “/home/oxidized/.config/oxidized/switch.db” delimiter: !ruby/regexp /:/ map: name: 0 model: 1 gpg: false model_map: cisco: ios juniper: junos |
Create the file /home/oxidized/.config/oxidized/switch.db and insert this information:172.16.2.251:ios
run the command: oxidized
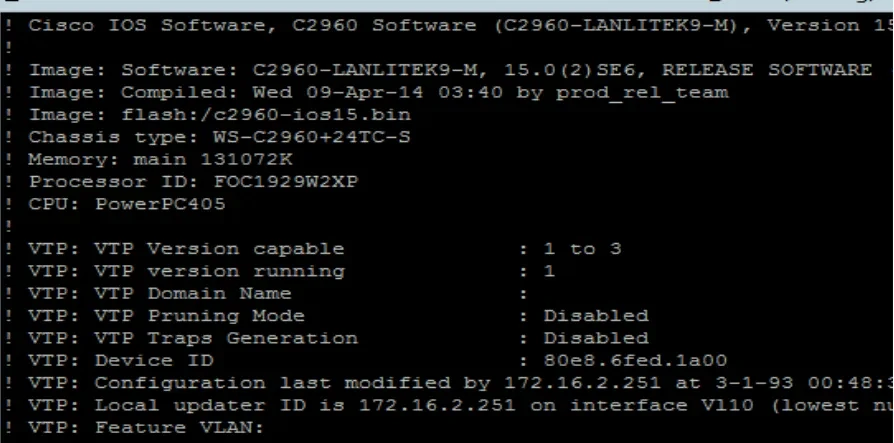
This will retrieve the switch configuration and save it to the directory:/home/oxidized/.config/oxidized/configs
excerpt from configuration file 172.16.2.251:
You can also have multiple device groups with different credentials. Oxidized supports this configuration.
Happy hacking!
Also, check out our comparative article on Rancid vs. Oxidized.
Common Errors During Oxidized Installation
- Incorrect SSH/Telnet credentials: Double-check your credentials in the configuration file.
- Ruby dependency issues: Ensure you have installed all necessary gems.
- Firewall blocking connections: Verify that the SSH port is open between the Oxidized server and your devices.
- Malformatted YAML configuration file: A simple indentation error can prevent the service from starting.
Read also: Rancid vs. Oxidized: Which solution to choose for your network?


