How to Install Home Assistant on Raspberry Pi: The Ultimate 2026 Guide
🤖 YAML Automation Generator
⚖️ WARNING: This ‘YAML Generator’ tool provides estimates based on standard mathematical models. Electrotuto cannot be held responsible for calculation errors or material consequences related to its use. Always verify your settings manually.
Installing Home Assistant on Raspberry Pi is the first step for anyone wishing to regain control of their smart home. Unlike closed cloud solutions, Home Assistant offers total freedom, enhanced security, and unprecedented interoperability between different brands of connected objects.
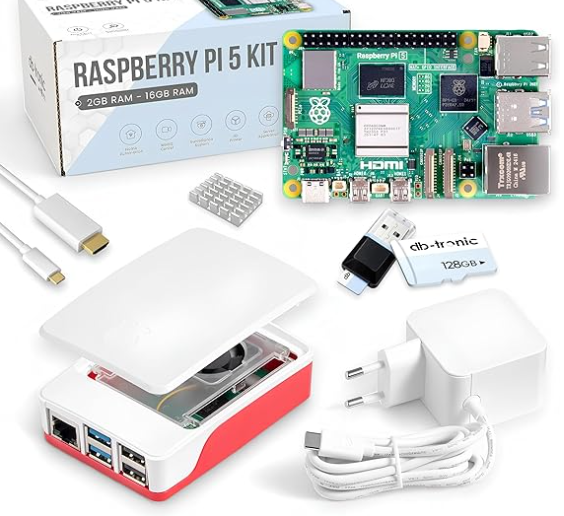
db-tronic Raspberry Pi 5 8GB Starter Kit (128GB Edition)
🛠️ The essential tool for this project.
🎥 Express Video Summary
Why Choose to Install Home Assistant on Raspberry Pi?
The advantage of installing Home Assistant on Raspberry Pi lies in its energy efficiency and the power of its community. Home Assistant (HA) is a local home automation operating system. This means your automations (turning on lights, managing heating) work even if your internet connection is cut. The Raspberry Pi 4 or 5 is the preferred platform because it is affordable, compact, and natively supports HAOS (Home Assistant Operating System).
1. Essential Hardware for a Reliable Server
Before installing Home Assistant on Raspberry Pi, ensure you have high-quality components. A low-end SD card is the leading cause of home automation system crashes. We strongly recommend using a USB SSD for optimal responsiveness and extended lifespan. You will also need a stable 3A power supply to avoid untimely reboots during peak loads.
2. Step by Step: Flashing the HAOS Image
To install Home Assistant on Raspberry Pi properly, use the Raspberry Pi Imager software.
1. Select your Raspberry Pi model.
2. In the “Other specific-purpose OS” category, choose Home Assistant.
3. Select your SSD or SD card.
4. Click write. Once finished, connect your Pi via Ethernet and turn it on.
3. Initial Configuration and Integrations
After successfully installing Home Assistant on Raspberry Pi, access the interface via http://homeassistant.local:8123. HA will automatically detect your devices on the network (Philips Hue, Sonos, Google Cast). This is where you can create your first scenarios, such as receiving an alert if your Arduino weather station detects a temperature that is too low.
Conclusion
You now have all the keys to install Home Assistant on Raspberry Pi. This is a project that never ends: you can then add a Zigbee stick to control hundreds of low-cost sensors. For advanced users, feel free to explore the command line through our Linux tutorials.
To consult the official list of compatible devices, visit the Home Assistant website.
Note: To further your technical knowledge, consult our guide on Ohm’s Law.
🧠 AI Selection: Related Topics (Vector RAG)
Our algorithm has found these articles that share a strong thematic proximity with your current reading:
- 🔗 Which motor to choose for your 3D printer? (NEMA 2026 Guide) (Affinity: 74%)
- 🔗 How to properly tune your 3D printer for perfect results (Affinity: 73%)
- 🔗 ESP32 vs Arduino: The Essential Guide for choosing your microcontroller in 2026 (Affinity: 73%)